您的位置:首页 > bitsprx3.dll专题 专门针对出现bitsprx3.dll错误的解决方案
bitsprx3.dll丢失怎么解决?bitsprx3.dll没有被指定在windows运行怎么解决?
其实很多用户玩单机游戏或者安装软件的时候就出现过这种问题,如果是新手第一时间会认为是软件或游戏出错了,其实并不是这样,其主要原因就是你电脑系统的该dll文件丢失了或者损坏了,这时你只需下载这个bitsprx3.dll文件进行安装(前提是找到适合的版本),当我们执行某一个.exe程序时,相应的DLL文件就会被调用,因此安装好之后就能重新打开你的软件或游戏了.
那么出现bitsprx3.dll丢失要怎么解决?
一、手动从本站下载dll文件
1、从下面列表下载bitsprx3.dll文件32位/64位 bitsprx3.dll 文件列表
| 文件大小 | 文件版本 | 文件描述 | MD5(点击列表MD5值下载文件) |
|---|---|---|---|
| 7K | 6.7.2600.5512(xpsp.080413-2108 | BackgroundIntelligentTransferService2.0Proxy | 7AC2633E03C7A2937AA5B3AB0CA5A7C7 |
| 7K | 6.6.3790.3959(srv03_sp2_rtm.07 | BackgroundIntelligentTransferService2.0Proxy | 5B6540C893A35887465D8395490E4B33 |
| 10K | 7.5.7600.16385(win7_rtm.090713 | BackgroundIntelligentTransferService2.0Proxy | 27169CC385259A89C0A29A317B419FB2 |
| 10K | 7.5.7000.0(winmain_win7beta.08 | BackgroundIntelligentTransferService2.0Proxy | 018A30366D2D3D1AAC91FF3BDD7B1C0D |
| 13K | 7.5.7600.16385(win7_rtm.090713 | BackgroundIntelligentTransferService2.0Proxy | 4927DF280CBD35B8C8C7B9FD80638643 |
| 7K | 6.6.3790.1830(srv03_sp1_rtm.05 | BackgroundIntelligentTransferService2.0Proxy | CFA35C342A6BDC9269E465F53DCD1A70 |
| 7K | 6.6.2600.2180(xpsp_sp2_rtm.040 | BackgroundIntelligentTransferService2.0Proxy | EEAFFDC9A33EC32DC7804B4999272FAB |
| 9.5K | 7.0.6000.16386(vista_rtm.06110 | BackgroundIntelligentTransferService2.0Proxy | 1D12C43D9CD27019939BFCCA82EF3A54 |
| 10K | 7.5.6002.18111(vistasp2_gdr_wi | BackgroundIntelligentTransferService2.0Proxy | 33EC6BB31B311A65FA611869FBA0F49B |
| 10K | 7.5.7600.16384(win7_rtm.090710 | BackgroundIntelligentTransferService2.0Proxy | C1966649A96A5EBF025B7DFB63C5FE7A |
| 7K | 6.7.3790.4088(srv03_sp2_qfe.07 | BackgroundIntelligentTransferService2.0Proxy | B2B84652199C85045FD33C1A6E10AE32 |
| 13K | 7.0.6000.16386(vista_rtm.06110 | BackgroundIntelligentTransferService2.0Proxy | 96C373007C11347540F4F73BCBCE85AB |
| 13K | 7.5.7600.16384(win7_rtm.090710 | BackgroundIntelligentTransferService2.0Proxy | 71645EF97287BFD4F3FD18AF6A9D0B9D |
| 7K | 6.7.2600.3300(xpsp.080125-2027 | BackgroundIntelligentTransferService2.0Proxy | AA7E02E651ADB30D48AA91A77391B684 |
| 9.5K | 6.6.3790.3959(srv03_sp2_rtm.07 | BackgroundIntelligentTransferService2.0Proxy | 33B891D29F723D241CDC9C230FFCDA5F |
| 7K | 6.7.2600.3143(xpsp_sp2_qfe.070 | BackgroundIntelligentTransferService2.0Proxy | A5FF2216E25CB48D01A967ABF5C4B994 |
| 7K | 6.6.2600.1596(xpsp2.040919-100 | BackgroundIntelligentTransferService2.0Proxy | C2A525E9922EF22BC48B318524802FE0 |
| 10K | 7.5.8102.0(winmain_win8m3.1108 | BackgroundIntelligentTransferService2.0Proxy | E3A8690D26EEF23E2DA5DE4C709C6D99 |
| 13K | 7.5.8102.0(winmain_win8m3.1108 | BackgroundIntelligentTransferService2.0Proxy | 6A55453E4C0788BED9A311F4B5C27F9A |
| 7K | 6.7.3790.2943(srv03_sp1_gdr.07 | BackgroundIntelligentTransferService2.0Proxy | 6C5E8673C7741D0F19FE45BA289EF4D9 |
| 7K | 6.7.3790.4088(srv03_sp2_gdr.07 | BackgroundIntelligentTransferService2.0Proxy | 0A07A47CDD865174350DAF5C19292B4C |
| 7K | 6.7.3790.2943(srv03_sp1_qfe.07 | BackgroundIntelligentTransferService2.0Proxy | B677B358EA1C4DD5C27A9CE42F435E3C |
| 10K | 7.5.7057.0(winmain.090305-2000 | BackgroundIntelligentTransferService2.0Proxy | CD1B7622FB7ACFAB5450BE3140F9B0E0 |
| 7K | 6.7.2600.3143(xpsp_sp2_gdr.070 | BackgroundIntelligentTransferService2.0Proxy | E77015636F1FEE21979D7B8608192F30 |
| 10K | 7.5.8250.0(winmain_win8beta.12 | BackgroundIntelligentTransferService2.0Proxy | 5BE5A06D9D1B12B6F57FA279BC49BB6D |
| 10K | 7.5.8294.0(winmain.120302-1914 | BackgroundIntelligentTransferService2.0Proxy | 7517B03BF11E75F6BC5935DF1089790C |
| 9.5K | 6.6.3790.1830(srv03_sp1_rtm.05 | BackgroundIntelligentTransferService2.0Proxy | 61CA63918EA968F23EFA56C049F621B8 |
| 13.5K | 7.6.8400.0(winmain_win8rc.1205 | BackgroundIntelligentTransferService2.0Proxy | 5F953C41B5AD4FCB4437BF1833ED4776 |
| 10.5K | 7.6.8400.0(winmain_win8rc.1205 | BackgroundIntelligentTransferService2.0Proxy | 282436B9266B67763D68973219EB092E |
| 10.5K | 7.6.9200.16384(win8_rtm.120725 | BackgroundIntelligentTransferService2.0Proxy | E26F382F6A513FA3055ED24B2233E5CB |
| 13.5K | 7.6.9200.16384(win8_rtm.120725 | BackgroundIntelligentTransferService2.0Proxy | 9C5C6526AA212D84EB1A291DE63ED4EE |
| 7K | 6.6.2600.1569(xpsp2_gdr.040517 | BackgroundIntelligentTransferService2.0Proxy | 4D7E36ED5C875692BB783288073154EB |
| 13.5K | 7.5.8250.0(winmain_win8beta.12 | BackgroundIntelligentTransferService2.0Proxy | C0146700D97EE4E5646AE98857415820 |
2、将下载的文件放入到你要运行的软件或者游戏的安装所在文件夹之中,可以右键点击主执行程序.exe然后选择"打开文件所在的位置" 找到安装目录,将文件复制进去。
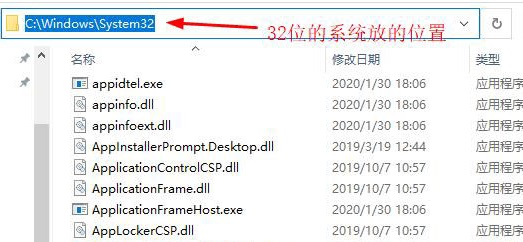
或者将文件复制到Windows系统目录,这个需要注意电脑的系统是32位还是64位,如果是32位的系统,那就将本站下载32位的dll文件放到“C:/Windows/System32”这个文件夹里面,
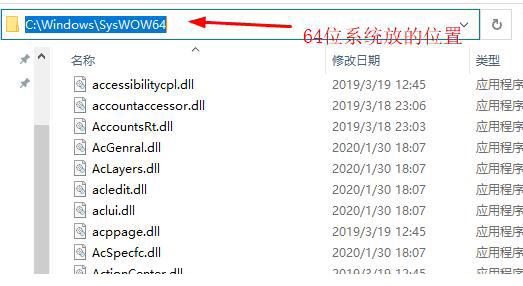
如果是64位的系统,那就将本站下载的32位dll文件放到“C:/Windows/SysWOW64”这个文件夹里面,本站下载的64位文件放到“C:/Windows/System32”这个文件夹里面.
如果问题依然无法解决,值得注意的是此类文件的丢失有时候和杀毒软件的误报毒有关,所以请将此类dll文件添加到杀毒软件的信任列表当中.
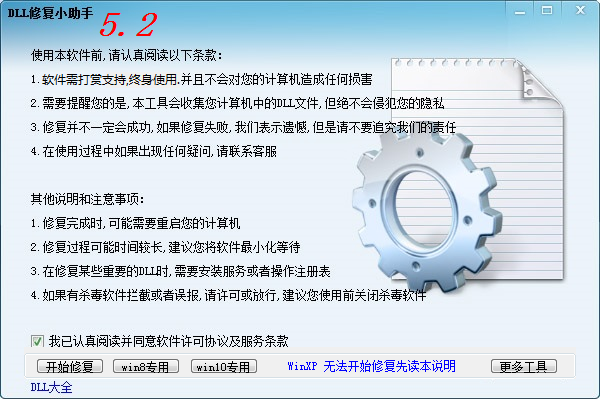
二、使用本站提供的软件进行自动修复
DLL修复小助手支持32位和64位Windows 2000、Windows 2003、Windows XP、Vista、windows 7以及windows 8 windows 10操作系统下的DLL全自动修复功能。为了确保您能够使用DLL修复小助手的修复功能,您需要确认您的计算机具备正常的互联网连接能力。软件开始修复后会自动检测您的DLL存在问题,并且连接我们的云服务器查找解决方案。DLL修复小助手软件具有修复Windows系统文件的特性,它可以帮助你修复系统软件或游戏丢失的DLL运行库文件。 如:DirectX游戏运行库,directx出现错误导致的游戏打不开等BUG; VC(Microsoft Visual C++)运行库是在Windows系统下运行Visual Studio开发的应用必备组件,缺少的话无法运行软件,会出现提示缺少DLL的情况。
DLL修复小助手全面支持32/64位 Windows XP,Windows Vista, Windows 7, Windows 8, Windows 8.1, Windows 10 操作系统
下载免安装绿色压缩包版本 | 百度网盘下载,下载完成后解压缩文件到任意位置下,执行主程序(DLL修复小助手.exe)即可打开软件,【vc++修复下载增强版】 可修复msvcp、msvcr、vcomp等问题百度网盘下载
一、点击“开始修复”或 “win8/win10专用”开始对系统丢失文件扫描
二、扫描同时自动修复丢失损坏文件
三、修复过程,请保持网络通畅,直到所有问题修复完成。